Friday, September 20, 2013

Maybe a Picture Would Help...


Today's hint on our quest to guess the gender is a picture of the ultrasound! Or, well, one of them. I know some doctors offices give you a disc with the photos, or even with a recording of the scan, but we get sent home with a strip of photos that look kind of like they came out of a photo booth. We don't own a scanner,and in any case they are all attached in one long strip that I have no desire to cut apart to be able to scan, anyway.

Little Booger is shy, and very, very active. I knew that, as I've been able to feel Little Booger since around fourteen weeks, and Little Booger hasn't seemed to stop moving since. While Dr. Allison was trying to measure all of the important bits, and be sure everything was forming correctly, it was a constant chase with me flipping over every few minutes to get Little Booger to move into a position that would work.

We saw several yawns, what looked like some suckling, lots of thumb sucking and hiding behind little hands, and so much kicking and flipping that Dr. Allison at one point asked if I had had caffeine that morning (I hadn't) and then said in the most sympathetic voice, "You probably feel all that all day long, huh? Baby thinks you're a trampoline."

In this picture we finally caught Little Booger with hands away from the face, but only because I needed to be punched right before this picture. Little Booger was mid stretch, which is why the legs are high up like they are. It was so fun to watch on the ultrasound, but right after this Little Booger pushed on one side of my uterus with little feet, and on the other with little hands.

Does Little Booger look like a boy or a girl to you? Let me know!

Thursday, September 19, 2013

I Know A Secret

Pre ultrasound pictures!
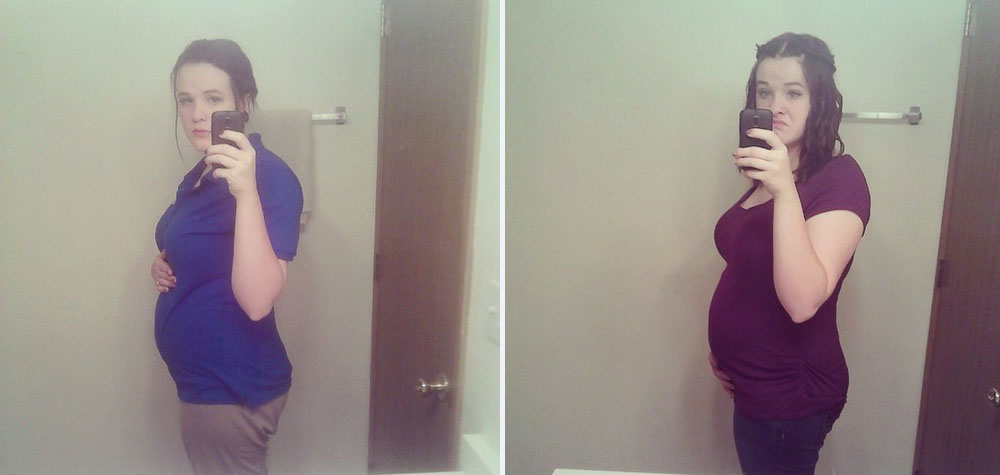
We had our anatomy scan and ultrasound today, and I know all kinds of juicy secrets now. I'll be doing the official gender reveal as our 22 week update, so until then, let's play a game! Below is a list of old wives' tales and what gender they predict I'll be having. Above is the most recent picture of how I'm carrying.

To aid in your choice, I'll give some family history. Jacob's grandpa Marvin Leach had seven brothers, and four sons. His father had three boys, and one girl. Jacob's brother has two boys. Jacob's grandpa Marvin Vore had eight boys and two girls. I have heard at least once a week from Jacob's parents, grandma, and brother that Leaches don't have girls, unless it's a fluke.

My great-grandma on my dad's side had three girls. My grandma Snyder had one son and one daughter. My great-grandma on my mother's side had four boys. My grandma Killingsworth had two daughters and one son. I have two brothers. The Killingsworth tradition is to have a girl first. 

So,comment below which you think it is!


Monday, September 16, 2013

21 Week Update


This has been another week that just took its sweet time getting by. Unlike last week, where so much happened, nothing at all happened this week.

Jacob started his second job, so I only get to see him for about 30 minutes in the morning. His best friend is back from Alaska and staying with us, and could possibly be moving into our lock out bedroom, which is weird to get used to, but ultimately okay, I suppose.

My phone fried my sim card, and rather than signing a contract for another two years and paying out the butt for a new phone with at&t, we cancelled my plan and I got a pay as you go phone that sucks. Good news is I can still use the old phone on wifi, like a mini tablet/iPod.


How far along? 21 weeks
Total weight gain: I honestly do not know at this point. I'll be weighed at the doctor's office on Thursday, so we'll see then.
Maternity clothes? The only new additions to the collection this week were two shirts I turned into maternity shirts: one uniform and one flannel.

Have you started to show yet: Definitely. The picture up top is from the start of week 21, but my work shirts don't show the bump off very well, so here's a picture from week 20.5, as well.


Stretch marks? None that I didn't have already.
Sleep: Still lots of discomfort and nightmares
Best moment this week: There's really not a moment this week that stands out to me.

Miss Anything? I miss going a day without a backache or headache
Movement: There is a TON of movement. I swear, the kid never sleeps
Food cravings: Thin mints. Oh my gosh, thin mints.

Anything making you queasy or sick: Prenatals, still
Gender: Unfortunately, we still don't know, and won't know until week 22.

Labor Signs: Definitely not.
Symptoms: HEADACHES, general discomfort, vivid dreams, backaches
Belly Button in or out? Still very much in. I don't think it will come out
Wedding rings on or off? It's on a necklace around my neck.It still fits just fine, but the fact that my hands and feet have been swelling and then going back to normal and then swelling again was making the ring rub my finger raw.

Happy or Moody most of the time: Weepy to the max.
Looking forward to: The gender reveal!

Friday, September 13, 2013

Bad Luck Comes in Threes


I figured this was a very fitting time to write this post, seeing as it is Friday the Thirteenth.

My whole life I've heard people say that bad luck comes in threes. I'd  like to think that it was just a self-fulfilling prophecy, that by looking for that one last bad thing to happen the individual causes it to come about. I'm not going to lie, I've caught myself bringing up that old superstition several times in the last few months.

"Oh, we'll be okay now. That was bad luck number three."

The good Lord had a sense of humor, because every time I think I've seen the third (and last) bad luck for a while, another rears its head. It seems to be one major financial woe, and one major stress inducer per week. Last week was my car, and realizing that I won't get to see my husband enough over the next few months. This week our washing machine broke, and I was told once and for all by my insurance company that I am 100% not eligible for short-term disability when the baby comes, which means I can officially only afford to take a two week maternity leave.

Oh, and my company changed its insurance policy and my maximum out of pocket and copay have almost doubled.

I've reached the point where all I can do is sit back, say, "All right, God. You've got this one, because I have no flipping idea what to do." 

Habakkuk 3:17-19 Though the fig tree should not blossom, nor fruit be on the vines, the produce of the olive fail and the fields yield no food, the flock be cut off from the fold and there be no herd in the stalls,  yet I will rejoice in the LORD; I will take joy in the God of my salvation. GOD, the Lord, is my strength; he makes my feet like the deer’s; he makes me tread on my high places
.

Wednesday, September 11, 2013

How to Turn Regular Jeans into Maternity Jeans


Since I've been pregnant, my life has been a perfect example of the saying "when it rains, it pours". Most specifically in the financial department. I was hit with the realization that my job does not provide paid maternity leave, and I'll only have three weeks of paid time off. My car is currently at the shop with an unknown problem that will cost an unknown amount. We purchased a new home and our monthly bills have gone up. So when I started looking at maternity clothes and saw just how much more expensive than normal clothes they are, I about died.

The majority of my maternity clothes are borrowed from my sister-in-law. My Mama recently purchased me a lot of maternity shirts off of ebay, but that leaves me with just two pair of maternity pants: my work pants, and a pair of jeans that has the nasty elastic that sits below your bump, which I hate. 

Being broke, I couldn't afford to drop $35 or more on one pair of maternity jeans which I'll only wear for a few months. I decided that since I could buy my normal jeans for anywhere from $7-$10, I would turn a pair of non-maternity jeans into maternity jeans.

What you'll need:
  1. A pair of regular jeans in your pre-pregnancy size, or whatever size is fitting your butt best now.
  2. Two tank tops a size or two smaller than you normally wear
  3. A sewing machine, or lots of patience
  4. Thread
  5. Needles
  6. Scissors

1. Cut the waistband of the jeans out, staying right against the hem around the back, and dipping the front to accommodate the growing belly. I cut one half of the front, and then folded the jeans over and traced that cut to ensure the dip for my belly was even. I would recommend using a higher waisted pant than I did. If you have a weak pair of scissors, you might wants to cut the zipper out prior to this step. While cutting, bear in mind whether or not you will be upset if you lose pocket function. After cutting you will be left with something like this:


2. Sew the flap that once was your zipper shut.


3. Take your tank top(s) and lay them out flat. Decide how high you would like your comfort top to ride, and then cut straight across the tank top. You could hem the raw edge if you would like, however you'll be sewing the raw edge to the jeans, so it is wholly unnecessary. For best results, use a thick tank top a few sizes smaller than your pre-pregnancy size. I bought a $4 tank top in size small from WalMart. If your tank top is thin, then it is best to sew two tank tops together. Of course, you can use a belly band if you have an extra/can afford it. I couldn't afford a pair of maternity jeans, so buying an extra belly band and a pair of jeans was out of the question, as they would cost the same amount. I spent a whopping $8 on the jeans and tank top to make this. You will end up with a tube, like thus:


4. Flip your tube inside out, and slide it over the top of your jeans so that the right sides are facing each other. I did a poor job of explaining in the video, but what I did was literally just slide the tube over the jeans, and then mark with pins where the bottom of the curve was. In the video it seems like I say to sew the band to the jeans straight across at the pockets, but I just meant to pin the tank top straight across below where you're sewing, to ensure that it doesn't move as you sew, and to ensure that it doesn't bunch and cause an uneven finish.

5. Pin along the the curve you cut into the pants to make a guideline for where to sew. 

6. Sew all the way around, using a zigzag stitch. Be sure to leave the pockets open if you were trying to save their usability. I sewed around again with a straight stitch, to perfect the seam and add durability.

7. Try them on to be sure they fit like you want, and alter as needed!


Monday, September 9, 2013

20 Week Update (Halfway There!)

This week has practically dragged itself by. I feel like it has taken forever to get to the point I'm writing a new blog. A lot happened this week, and they were all things that have one of those nasty two-sided effects: it sucks in the short term, but in the long term you have to do it or the consequences will be disastrous. 

My car broke down on Tuesday in the most delightful way.I was at a stoplight when the engine suddenly started making the sound of a train whistle and it started overheating like crazy. It's had a slow leak since I got it, and I suppose it reached the point where it couldn't take it anymore. I made it to work, and while I was working flights 1141 and 1133, my parents apparently drove out and put water in it, and called to make an appointment.

The darned thing took $1250 of repairs. For one part. Like I said, it sucks in the short term, but long term it had to be done.

Jacob also got a second job this week. We've known for a while that we need another source of income, and I can't really find one, as most places don't want to hire someone who can only work Thursdays and Fridays and will be leaving in January. The thing that sucks so much about it is that I will literally only see him for half an hour in the mornings, and on weekends before and after work. He'll be working Mondays, Wednesdays, and Fridays, on top of school and his other job, and he has night classes on Tuesdays and Thursdays until 9, and I can't stay up that long.


How far along? 20 weeks
Total weight gain: Dude not even kidding, I'm up another 3 pounds this week, putting me at 4 above my starting weight.
Maternity clothes? Like I mentioned a couple weeks ago, my Mama bought me some maternity shirts. I've since turned a pair of jeans and a pair of work pants into maternity pants (tutorial on Wednesday!) and will be making some old nasty shirts into maternity shirts.

Have you started to show yet: Undoubtedly. I look like I'm due in a month, not four and a half. The amount I've grown in the last week is mind boggling. For comparison purposes:


Stretch marks? None that I didn't have already.
Sleep: I've been having lots of nightmares, still. Sleep is uncomfortable and restless.
Best moment this week: Jacob got a second job. I feel very conflicted about it, but I know that we have to have it in order to survive financially once Little Booger gets here

Miss Anything? I miss going a day without a backache or headache
Movement: There is a TON of movement. I swear, the kid never sleeps
Food cravings: Not really anything this week,

Anything making you queasy or sick: My new prenatal vitamins make me quite nauseous, still
Gender: Unfortunately, we still don't know, and won't know until week 22.

Labor Signs: Definitely not.
Symptoms: HEADACHES, general discomfort, vivid dreams, backaches
Belly Button in or out? Still very much in. I don't think it will come out
Wedding rings on or off? Still on, but there is swelling on hot days.

Happy or Moody most of the time: I would say I've been fairly normal this week.
Looking forward to: The gender reveal, and reassurance it isn't twins.

Friday, September 6, 2013

Circle Skirt Tutorial

Shopping for maternity clothing has been one of the most depressing and difficult things I have ever had to do. Everything is very blah, and I can't seem to find anything affordable that is even remotely my style. I own several skater dresses and circle skirts that still fit (kind of) and I decided that rather than searching and searching for cute maternity dresses/skirts, I would bust out the elastic and make myself a few skirts.

Circle skirts are arguably the easiest starter sewing project out there, and are flattering on practically everyone, including pregnant ladies. I made mine with an elastic waist, to accommodate my growing belly.

What you'll need

  1. Measuring tape longer at least 36 inches long
  2. Scissors
  3. Fabric pencil
  4. Straight pins
  5. At least 1 1/2 yards of lightweight fabric
  6. Elastic for the waistband
  7. Sewing Machine or lots of patience and a thread and needle
Step 1) Take your fabric and fold it in half lengthwise, and then fold it in half width wise, i.e. hot dog and hamburger. You should have one edge that's the main fold, one edge that has two folds, and two edges that are not folded at all, and have four pieces of fabric.

Step 2) Refer to the following list and pick your size. These are based on American sizes, and I used the Asos size chart to do the math, so you might refer to it here if you have any questions about your size.

  • Size 2 - 3 4/5 in
  • Size 4 - 4 in
  • Size 6 - 4 2/5 in
  • Size 8 - 4 3/5 in
  • Size 10 - 5 in
  • Size 12 - 5 1/4 in
  • Size 14- 5 3/4 in
  • Size 16 - 6 1/5 in
  • Size 18 - 6 1/2 in
  • Size 20 - 7 in
  • Size 22 - 7 1/3 in
Step 3) Using the number after your size, take your tape measure and poke a hole through the 0 inch mark, and whatever inch is following your size. For example, I poked the hole through 5 1/2, since I'm a size 12, but I wanted a little pregnancy space. Place your straight pin through the hole at the 0 inch mark, and your fabric pencil through the second hole.

Step 4) Place the straight pin through the corner of your fabric where the two folded edges meet. Holding the pencil with one hand and the straight pin with the other, move the pencil as if it were a giant compass. This mark will be the waist of your skirt.

Step 5) Decide how long you want your skirt to be. I personally made mine 22 inches, due to my height and the pregnancy. Since my waistline was a 5 1/2 radius, I simply added 22 plus 5 1/2, giving me 27 1/2 inches. Add a seam allowance, and voila.Poke another hole in your tape measure at this number, and move the pencil to that hole. Repeat the same process you used for marking the waistline, and voila. You have your pattern drawn out.

Step 6) Cut it out! You should end up with a donut shaped piece of fabric. Yay, fewer seams.

Step 7) Wrap elastic around your waist, pulling it until it fits as you would like it to. This is typically about a half inch shorter than your waist. At this point you'll be sewing the elastic onto the waistband in any way you choose.  Rather than trying (and probably failing) to explain how to attach an elastic waist band, I will reference you to this tutorial. It is great if you've never sewn an elastic band before, or even if you have. The important thing to remember is to be very accurate when marking the center marks on both the elastic and the skirt.

Step 8) Hem the bottom of the skirt.

Voila! You have your very own circle skirt.